
大家好, 这次大表哥带来的分享是 pg 15 集成 pgpool 4.3 基于springboot 2.5 的ha 测试。
**重要的声明!!!:
pg 15 beta 版本是 上个月中旬新发布的版本, pg pool 4.3 也是目前(写文章的时间是2022-06-24)最新的版本。 本文是存技术方案测试案例篇。生产环境强烈不建议2者都使用最新的版本来部署。本文很有可能是全网第一篇都使用最新版本来测试的。 **
接下来我们开始愉快的安装测试吧:
pg 15的安装: 可以参考我之前的文章 https://www.modb.pro/db/411245
我们这次专注于pg pool 的安装:(大表哥一如既往的保姆式 step by step 的style)
pg pool 的m6米乐安卓版下载官网的下载地址:
https://www.pgpool.net/mediawiki/index.php/downloads
同样pg pool 提供了rpm , yum 和 源码 的三种安装方式。
我们这里选择下载源码的版本是 pgpool-ii 4.3 (stable) 发布日期是 2022-05-19
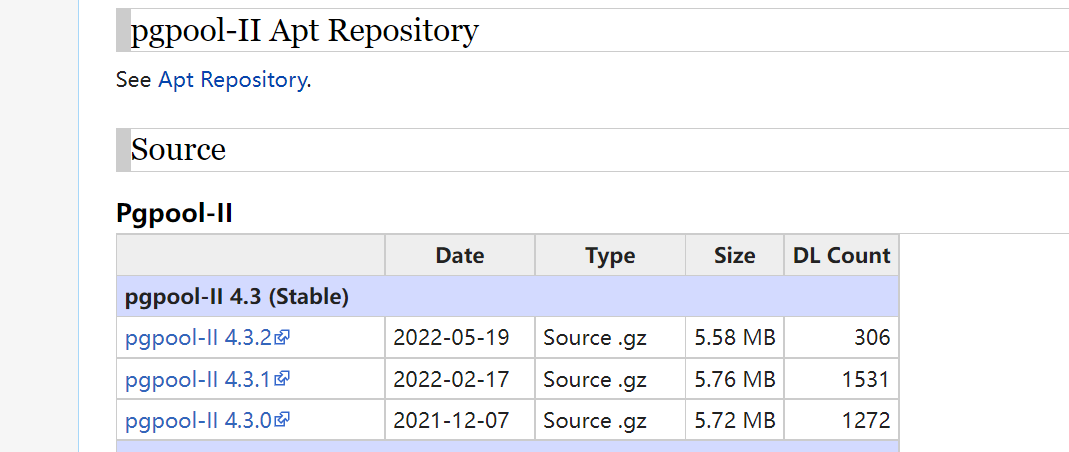
下载:
infra [postgres@wqdcsrv3352 postgresql]# wget https://www.pgpool.net/mediawiki/images/pgpool-ii-4.3.2.tar.gz
--2022-06-19 19:41:40--  https://www.pgpool.net/mediawiki/images/pgpool-ii-4.3.2.tar.gz
resolving www.pgpool.net (www.pgpool.net)... 13.249.146.41, 13.249.146.110, 13.249.146.6, ...
connecting to www.pgpool.net (www.pgpool.net)|13.249.146.41|:443... connected.
http request sent, awaiting response... 200 ok
length: 5846769 (5.6m) [application/x-gzip]
saving to: ‘pgpool-ii-4.3.2.tar.gz’

100%[============================================================================================>] 5,846,769   5.52mb/s   in 1.0s
2022-06-19 19:41:42 (5.52 mb/s) - ‘pgpool-ii-4.3.2.tar.gz’ saved [5846769/5846769]
解压源代码并进行重命名:
infra [postgres@wqdcsrv3352 postgresql]# tar -xvf pgpool-ii-4.3.2.tar.gz
infra [postgres@wqdcsrv3352 postgresql]# mv pgpool-ii-4.3.2 pgpool
安装步骤可以依赖官方文档: 这个源码安装和其他的c语言开发的软件都是一样的
https://www.pgpool.net/docs/latest/en/html/install-pgpool.html
编译的参数简单说明:
–prefix=path 安装编译之后的路径 默认是
我们创建编译路径进行编译:
infra [postgres@wqdcsrv3352 postgresql]# mkdir -p /opt/postgresql/pgpool4.3
infra [postgres@wqdcsrv3352 pgpool]# ./configure --prefix=/opt/postgresql/pgpool4.3
infra [postgres@wqdcsrv3352 pgpool]# make && make install
编译完成后,我们查看以一下版本:
infra [postgres@wqdcsrv3352 bin]# /opt/postgresql/pgpool4.3/bin/pgpool --version
pgpool-ii version 4.3.2 (tamahomeboshi)
接下来,我们需要安装 pgpool-recovery, 我们进入到pg pool的源码路径下:
infra [postgres@wqdcsrv3352 src]# pwd
/opt/postgresql/pgpool/src/sql/pgpool-recovery
infra [postgres@wqdcsrv3352 pgpool-recovery]# make && make install
我们来创建我们的 extension : 注意我们需要安装在数据库 template1 下面
infra [postgres@wqdcsrv3352 pgpool-recovery]# psql -h /tmp -p 1992
postgres@[local:/tmp]:1992=#14277 \c template1
template1@[local:/tmp]:1992=#14286 create extension pgpool_recovery;
create extension
对于 pgpool-ii 3.3 or later 的版本,我们还需要在配置文件中设置参数 pgpool.pg_ctl
vi postgresql.conf 中添加
pgpool.pg_ctl='/opt/postgresql/pg15/bin/pg_ctl'
reload 生效
postgres@[local:/tmp]:1992=#15017 select pg_reload_conf();
pg_reload_conf
----------------
t
(1 row)
okay。 至此我们单机版的pg pool 简单安装已经完毕,
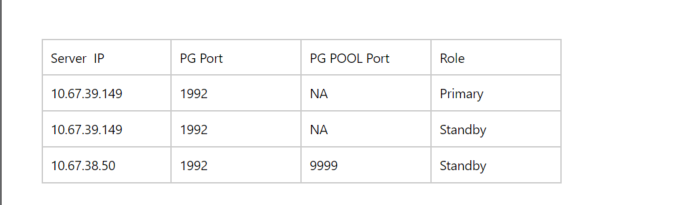
下面我们要配置一下 1 节点的pg pool 3 节点的数据源 (1 主 2 从) 的架构
我们在启动pgpool 之前,还需要做如下的配置:
1)关闭机器之间的防火墙
sudo systemctl stop firewalld.service
sudo systemctl disable firewalld.service
2)打通机器之间的ssh 免密登录
默认的情况下, root 账户启动pgpool 我们要打通 root 账号 到 postgres 账号之间的免密
需要在 root 下执行:
infra [root@wqdcsrv3352 .ssh]# ssh-copy-id -i id_rsa_pgpool.pub postgres@10.67.38.50
/bin/ssh-copy-id: info: source of key(s) to be installed: "id_rsa_pgpool.pub"
/bin/ssh-copy-id: info: attempting to log in with the new key(s), to filter out any that are already installed
/bin/ssh-copy-id: info: 1 key(s) remain to be installed -- if you are prompted now it is to install the new keys
number of key(s) added: 1
now try logging into the machine, with:   "ssh 'postgres@10.67.38.50'"
and check to make sure that only the key(s) you wanted were added.
infra [root@wqdcsrv3352 .ssh]# ssh-copy-id -i id_rsa_pgpool.pub postgres@10.67.39.149
/bin/ssh-copy-id: info: source of key(s) to be installed: "id_rsa_pgpool.pub"
/bin/ssh-copy-id: info: attempting to log in with the new key(s), to filter out any that are already installed
/bin/ssh-copy-id: info: 1 key(s) remain to be installed -- if you are prompted now it is to install the new keys
number of key(s) added: 1
now try logging into the machine, with:   "ssh 'postgres@10.67.39.149'"
and check to make sure that only the key(s) you wanted were added.
infra [root@wqdcsrv3352 .ssh]# ssh-copy-id -i id_rsa_pgpool.pub postgres@10.67.39.49
/bin/ssh-copy-id: info: source of key(s) to be installed: "id_rsa_pgpool.pub"
/bin/ssh-copy-id: info: attempting to log in with the new key(s), to filter out any that are already installed
/bin/ssh-copy-id: info: 1 key(s) remain to be installed -- if you are prompted now it is to install the new keys
number of key(s) added: 1
now try logging into the machine, with:   "ssh 'postgres@10.67.39.49'"
and check to make sure that only the key(s) you wanted were added.
3)ha 自动切换的脚本的改动: 一共有2个
配置 failover 和 follow_primary 的 脚本
failover.sh
infra [postgres@wqdcsrv3352 etc]# cp failover.sh.sample failover.sh
infra [postgres@wqdcsrv3352 etc]# vi failover.sh
修要修改 pghome=/opt/postgresql/pg15
follow_primary.sh : 注意如果是一主一从,则不需要配置这个脚本。 3个节点(包含3节点),在发生主从切换的时候 ,其他的从节点需要重定向复制源。这个时候就需要这个脚本
infra [postgres@wqdcsrv3352 etc]# cp follow_primary.sh.sample follow_primary.sh
infra [postgres@wqdcsrv3352 etc]# vi follow_primary.sh
pghome=/opt/postgresql/pg15
archivedir=/data/postgresql/1992/archive_wals
repluser=repluser
pcp_user=postgres
pgpool_path=/opt/postgresql/pgpool4.3
pcp_port=9898
4)创建数据库的健康监测账户
postgres@[local:/tmp]:1992=#63922 create role pgpool  with login password 'pgpool';
create role
postgres@[local:/tmp]:1992=#63922 grant pg_monitor to pgpool;
grant role
5)配置核心配置文件 pgpool.conf
infra [postgres@wqdcsrv3352 etc]# cp pgpool.conf.sample pgpool.conf
infra [postgres@wqdcsrv3352 etc]# vi pgpool.conf
backend_clustering_mode = 'streaming_replication' --流复制的模式
listen_addresses = '*'  -- 允许远程连接
port = 9999  -- pgpool 监听的端口
pid_file_name = '/opt/postgresql/pgpool4.3/pgpool.pid'
# backend connection settings -- 后台pg数据库的配置
pool_passwd = 'pool_passwd'
backend_hostname0 = '10.67.38.50'
backend_port0 = 1992
backend_weight0 = 1
backend_data_directory0 = '/data/postgresql/1992/backups'
backend_flag0 = 'allow_to_failover'
backend_application_name0 = 'pg50'

backend_hostname1 = '10.67.39.149'
backend_port1 = 1992
backend_weight1 = 1
backend_data_directory1 = '/data/postgresql/1992/data'
backend_flag1 = 'allow_to_failover'
backend_application_name1 = 'pg149'
backend_hostname1 = '10.67.39.49'
backend_port1 = 1992
backend_weight1 = 1
backend_data_directory1 = '/data/postgresql/1992/data'
backend_flag1 = 'allow_to_failover'
backend_application_name1 = 'pg49'

### 复制检查延时设置
sr_check_period = 10
sr_check_user = 'pgpool'
sr_check_password = 'pgpool'
sr_check_database = 'postgres'

### 主从ha 健康监测账号
health_check_timeout = 20
health_check_user = 'pgpool'
health_check_password = 'pgpool'
health_check_database = 'postgres'

### 主从切换调用的 shell 脚本配置
failover_command = '/opt/postgresql/pgpool4.3/etc/failover.sh %d %h %p %d %m %h %m %p %r %r %n %s'
follow_primary_command = '/opt/postgresql/pgpool4.3/etc/follow_primary.sh %d %h %p %d %m %h %m %p %r %r'
6)创建密码文件: 为了 failover 的时候 执行 promote的命令用
注意这个在 root 账户下, 以为我们是用root 启动的 pgpool
infra [root@wqdcsrv3352 ~]# cat .pgpass
10.67.38.50:1992:postgres:repluser:repluser
10.67.39.49:1992:postgres:repluser:repluser
10.67.39.149:1992:postgres:repluser:repluser
10.67.38.50:1992:postgres:postgres:postgres
10.67.39.49:1992:postgres:postgres:postgres
10.67.39.149:1992:postgres:postgres:postgres
infra [root@wqdcsrv3352 ~]# chmod 600 ./.pgpass
7)为pcp 创建密码文件
注意这个在 root 账户下, 以为我们是用root 启动的 pgpool, 这个为了 attach 节点用的
infra [root@wqdcsrv3352 ~]# vi .pcppass
infra [root@wqdcsrv3352 ~]# chmod 600 .pcppass
infra [root@wqdcsrv3352 ~]# cat .pcppass
localhost:9898:postgres:postgres
8)配置pgpool 账号信息 编辑文件 pool_passwd, 默认是在 pgpool_home/etc/下的
这里要注意了, 由于从pg14开始 默认的数据库加密变成 scram-sha-256 的方式。
所以我们不需要用md5的方式 进行密码二次加密了, 对于 scram-sha-256 这加密方式, pg的 pool_passwd直接写成明文也是可以工作的。
具体详情可以参考文档 : https://www.pgpool.net/docs/42/en/html/auth-methods.html
infra [postgres@wqdcsrv3352 etc]# cat pool_passwd
postgres:postgres
9)配置pgpool的hba 文件
host all postgres 0.0.0.0/0 scram-sha-256
- pcp conf 里面添加管理员的账号和密码 (注意这个是md5的模式)
infra [postgres@wqdcsrv3352 etc]# view pcp.conf
# userid:md5passwd
postgres:e8a48653851e28c69d0506508fb27fc5
11)启动pgpool
/opt/postgresql/pgpool4.3/bin/pgpool -f /opt/postgresql/pgpool4.3/etc/pgpool.conf -f /opt/postgresql/pgpool4.3/etc/pcp.conf > /tmp/pgpool.log
我们查看进程: 和 oracle, pg 一样的多进程的连接模式
infra [root@wqdcsrv3352 pgpool4.3]# ps -ef| grep pgpool
root      80663      1  1 15:19 ?        00:00:00 /opt/postgresql/pgpool4.3/bin/pgpool -f /opt/postgresql/pgpool4.3/etc/pgpool.conf -f /opt/postgresql/pgpool4.3/etc/pcp.conf
root      80665  80663  0 15:19 ?        00:00:00 pgpool: wait for connection request
root      80666  80663  0 15:19 ?        00:00:00 pgpool: wait for connection request
root      80667  80663  0 15:19 ?        00:00:00 pgpool: wait for connection request
root      80668  80663  0 15:19 ?        00:00:00 pgpool: wait for connection request
查看pg pool 的节点状态:
status: pg pool 中的节点状态
pg_status: pg instance 数据库本身的状态
lb_weight: 权重
role: pg pool 中的角色
pg_role: pg instance 数据库本身的角色
infra [postgres@wqdcsrv3352 backups]# psql -h 10.67.38.50 -p 9999 -upostgres  postgres
postgres@10.67.38.50:9999=#37226 show pool_nodes;
node_id |   hostname   | port | status | pg_status | lb_weight |  role   | pg_role | select_cnt | load_balance_node | replication_delay | replication_state | replication_sync_state | last_
status_change
--------- -------------- ------ -------- ----------- ----------- --------- --------- ------------ ------------------- ------------------- ------------------- ------------------------ ------
---------------
0       | 10.67.38.50  | 1992 | up     | up        | 0.333333  | standby | standby | 0          | false             | 0                 |                   |                        | 2022-
06-24 14:59:44
1       | 10.67.39.149 | 1992 | up     | up        | 0.333333  | primary | primary | 3          | true              | 0                 |                   |                        | 2022-
06-24 14:59:44
2       | 10.67.39.49  | 1992 | up     | up        | 0.333333  | standby | standby | 0          | false             | 0                 |                   |                        | 2022-
06-24 14:59:44
(3 rows)
我们用springboot 写一个小的网页,测试一下基于 pgpool的 ha 的 应用透明故障转移
pom 文件中,加入依赖的驱动jar 包
    org.postgresql
    postgresql
    runtime
关于数据库的配置: 我们配置 连接池的上限是 200, 池子中的最小空闲连接时10
//数据库的地址以及端口号
spring.datasource.url=jdbc:postgresql://10.67.38.50:9999/postgres
spring.datasource.username=app_ha_user
spring.datasource.password=app_ha_user
spring.datasource.driverclassname=org.postgresql.driver
spring.jpa.properties.hibernate.dialect=org.hibernate.dialect.postgresqldialect
spring.jpa.properties.hibernate.hbm2ddl.auto=update
spring.datasource.maximum-pool-size=200
spring.datasource.min-idle=10
这里我们配置的应用连接账号是 app_ha_user/app_ha_user .
我们必须在 pgpool 端和pg 数据库内 都要添加这个账户,才可以通过pgpool 连接到真正的pg实例上面。
a) pg 数据库创建账户 : 这里我们需要注意,从pg 14 开始 默认的加密方式从md5 改成了 scram-sha-256。
postgres@10.67.38.50:9999=#37226 show password_encryption ;
password_encryption
---------------------
scram-sha-256
(1 row)
postgres@10.67.38.50:9999=#37226 create user app_ha_user with login password 'app_ha_user';
b)添加到 pgpool etc 目录下的 (/opt/postgresql/pgpool4.3/etc) 的 pool_passwd
这里我们需要特别注意一下, pgpool 对于 scram-sha-256 的加密方式,目前支持2种模式:
1) text password: 明文文本
2)基于机密key 的模式。 可以使用自带的机密工具 pg_enc
具体详情可以参考文档 : https://www.pgpool.net/docs/42/en/html/auth-methods.html
这里我们采用简单的明文文本模式,方便测试
postgres:postgres
app_ha_user:app_ha_user
c) 分别在pgpool和pg 数据端的pg_hba.conf 添加账户并reload 生效
pg 数据库端: 需要在3个节点上都运行
host all app_ha_user 0.0.0.0/0 scram-sha-256
pg pool 端:
host all app_ha_user 0.0.0.0/0 scram-sha-256
pg reload:
infra [postgres@wqdcsrv3353 data]# psql -h /tmp -p 1992
psql (14.3, server 15beta1)
warning: psql major version 14, server major version 15.
         some psql features might not work.
type "help" for help.
postgres=# select pg_reload_conf();
pg_reload_conf
----------------
t
(1 row)
pg pool reload:
infra [root@wqdcsrv3352 ~]# /opt/postgresql/pgpool4.3/bin/pgpool reload
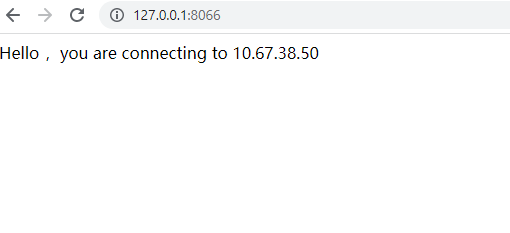
我们启动网页小程序,很简单就是显示出当前连接的ip 地址
string sql = "select inet_server_addr()";
   // 通过jdbctemplate查询数据库
   string hostname = (string)jdbctemplate.queryforobject(
           sql, string.class);
return "hello ,you are connecting to "   hostname;
http://127.0.0.1:8066/

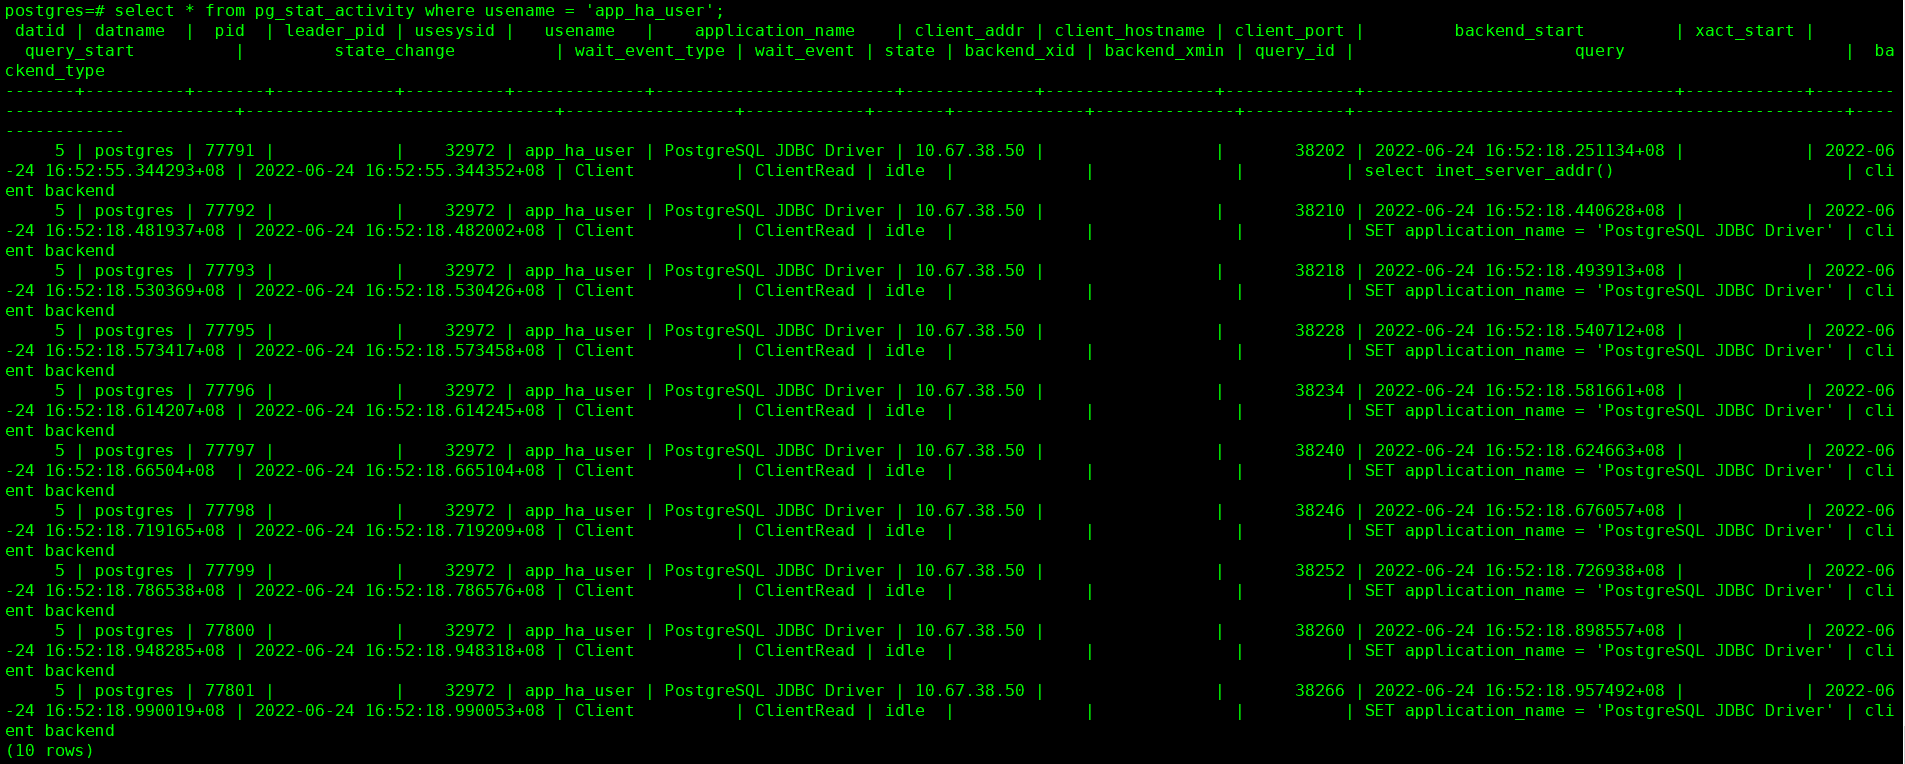
我们查看pgpool 的连接池里面的连接:
我们查看pg 数据库 主库内的连接信息:我们可以看到和我们的springboot中 最小空闲数10 是一致的
我们接下来,手动关闭 主库测试一下 ha
infra [postgres@wqdcsrv3354 data]# /opt/postgresql/pg15/bin/pg_ctl -d /data/postgresql/1992/data stop -m fast
waiting for server to shut down.... done
server stopped
我们手动刷新一下 测试小程序的页面:我们可以看到主节点已经 指向了50 这个节点
我们来看一下 小程序端日志,在数据库发生failover 的时候也会 出现连接异常信息:正好是我们连接池中的10个连接信息
2022-06-24 17:08:19,060 warn (poolbase.java:184)- hikaripool-1 - failed to validate connection org.postgresql.jdbc.pgconnection@11268563 (this connection has been closed.). possibly consider using a shorter maxlifetime value.
2022-06-24 17:08:19,070 warn (poolbase.java:184)- hikaripool-1 - failed to validate connection org.postgresql.jdbc.pgconnection@241d07b (this connection has been closed.). possibly consider using a shorter maxlifetime value.
2022-06-24 17:08:19,071 warn (poolbase.java:184)- hikaripool-1 - failed to validate connection org.postgresql.jdbc.pgconnection@27e950cd (this connection has been closed.). possibly consider using a shorter maxlifetime value.
2022-06-24 17:08:19,073 warn (poolbase.java:184)- hikaripool-1 - failed to validate connection org.postgresql.jdbc.pgconnection@a6e0135 (this connection has been closed.). possibly consider using a shorter maxlifetime value.
2022-06-24 17:08:19,074 warn (poolbase.java:184)- hikaripool-1 - failed to validate connection org.postgresql.jdbc.pgconnection@2b8b2551 (this connection has been closed.). possibly consider using a shorter maxlifetime value.
2022-06-24 17:08:19,075 warn (poolbase.java:184)- hikaripool-1 - failed to validate connection org.postgresql.jdbc.pgconnection@27c5fa53 (this connection has been closed.). possibly consider using a shorter maxlifetime value.
2022-06-24 17:08:19,075 warn (poolbase.java:184)- hikaripool-1 - failed to validate connection org.postgresql.jdbc.pgconnection@4ac7a95e (this connection has been closed.). possibly consider using a shorter maxlifetime value.
2022-06-24 17:08:19,075 warn (poolbase.java:184)- hikaripool-1 - failed to validate connection org.postgresql.jdbc.pgconnection@30da6e9a (this connection has been closed.). possibly consider using a shorter maxlifetime value.
2022-06-24 17:08:19,076 warn (poolbase.java:184)- hikaripool-1 - failed to validate connection org.postgresql.jdbc.pgconnection@4289647d (this connection has been closed.). possibly consider using a shorter maxlifetime value.
2022-06-24 17:08:19,077 warn (poolbase.java:184)- hikaripool-1 - failed to validate connection org.postgresql.jdbc.pgconnection@4a96091d (this connection has been closed.). possibly consider using a shorter maxlifetime value.
我们查看pg pool 的节点的状态: down 点的节点是我们 手动关闭的老的主节点, 剩下的新的节点 一主一从的状态是正常的
postgres@10.67.38.50:9999=#42271 show pool_nodes;
\ node_id |   hostname   | port | status | pg_status | lb_weight |  role   | pg_role | select_cnt | load_balance_node | replication_delay | replication_state | replication_sync_state | last_
status_change
--------- -------------- ------ -------- ----------- ----------- --------- --------- ------------ ------------------- ------------------- ------------------- ------------------------ ------
---------------
0       | 10.67.38.50  | 1992 | up     | up        | 0.333333  | primary | primary | 1          | true              | 0                 |                   |                        | 2022-
06-24 17:06:12
1       | 10.67.39.149 | 1992 | down   | down      | 0.333333  | standby | unknown | 11         | false             | 0                 |                   |                        | 2022-
06-24 17:06:12
2       | 10.67.39.49  | 1992 | up     | up        | 0.333333  | standby | standby | 0          | false             | 0                 |                   |                        | 2022-
06-24 17:07:46
(3 rows)
目前来说 pg 15 集成 pgpool 4.3 基于springboot 2.5 的ha 测试结果符合我们的预期。